
Now i've nearly finished my type-100 (the last bit is in the post), I want to have a go at another pacific theatre weapon, the Owen gun. Known for its reliability, if not its accuracy, the owen was a very popular weapon with troops and served with the Australian army up until the Vietnam war, when it was eventually replaced with the F1, based on the british sterling.
I'll be scratch building the owen, to keep cost down. I will be using a modified AK hop up and barrel, aluminium tubing, steel plate, an AEP gearbox, and Mp40 or Uzi magazines. It will be held together using high strength glues, and bolts where required or possible. As I lack a decent workshop, the emphasis will be on producing a working gun rather than a 100% accurate replica, so concessions will have to be made on various things to make them either possible or strong enough; sometimes cost will be a deciding factor as well. This is the basic plan:

As you can see, the forward pistol grip is from an ak and the rear the lower receiver from an M93R; using the receiver is a necessity, to save production time and to help mount the gearbox in the correct place. I will be disguising it as much as possible throughout the build.
So far, i've built the hop up and started chopping the tubing i'm using for the reciver. The AEP parts are on their way, kindly donated by a member or arnie's airsoft.
The hop up was a simple job - I inverted the barrel in the hop unit so the hole in the barrel was at the top. I then drilled a small hole just forwards of the feed nozzel asnd insterted a rubber tipped screw; carefully adjusting this screw allows for a hop-up similair to the original.

regards,
-Matt
Some progress:

Obviously theres a slight problem with the magazine placement - but it's only about 1" further back than it's meant to be, so i'm not really worried, although this may not end up as a perfect replica. Epoxy is to hold the barrel and hope in place. Don't ask about the sign, it turned up randomly the other day from who knows where.
-Matt

Looks like an interesting build.

Free speech is expensive these days!

Thankyou ![]()

Started work on the reciver and stock. It's all a bit rough and ready, but it is working now. The gun takes a mini 7.2V battery in the stock, with the wires running through the receiver. The Lower receiver will be enlarged and neatened up a little using epoxy. Major bits still to do are the magazine well, outer barrel and forward pistol grip.
regards,
-Matt

good effort man, better than i could ever do.
Now a 'namsofter. I have an M72 L.A.W. for sale for 110 posted, PM if interested.

Thats a bloody good effort, well thought out especially the use of the aep box, and the magazine looks like it`ll sit close enough to the original position. 
Cheers guys. Still a fair bit of work to do, but there's always milliput and other fine epoxies to help ![]()
If you're wondering why it's progressing so fast, it's because i'm snowed in and there's nothing else to do save revise and go on the interweb. ![]()
-Matt
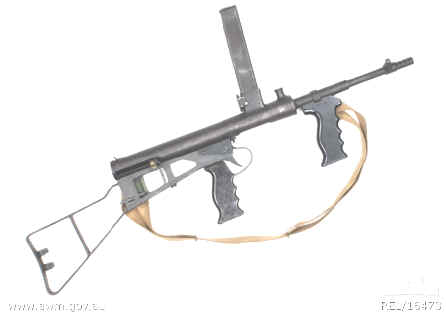
More progress:

Mag well attached, but holes need filling with more resin and bolts need to be added for strength.
Not much more to do now :mellow: .
-Matt

looking good, maybe cut and sand off the pistol port recoil guard under the foresight, it look far too mp 40, without it it would look better
actually unscrew the muzzle cap and it should slide off, making cutting easy
"Take that you rotton helping of strawberry flan!"
Joseph Porta to "strawberrys and cream", in the sven hassel book ,ogpu prison
I am, don't worry . The Mp40 barrel isn't attached atm, just sitting there. I'll be using a straight magazine too. The whole lot comes away, leaving a tapered barrel.
Actually, it's quite handy that it has a threaded muzzle - I can mount a silencer and RIS rail set now 
I tested it with an 8.4v mini battery this morning, and blue smoke ensued. Once the risk of fire had abated, I tested again with a 7.2v battery and luckily it worked - I was quite worried for a few minutes there where I thought i'd buggered it.
-Matt
And finished - kind of. I'd nearly completed all of the externals when I decided to put a few mags through to test everything was working correctly. It was fine for the first 10 or so shots, then the trigger contacts went. I had to rip the gun open (no mean feat at that point) and repair them, which I duly did. I then tested it again, and the gears stripped. I can only guess that the 7.2v mini was too powerful, and the internals just tore themselves apart.
Too disheartened to continue, i've taken all of the useable internals out for future projects. I bolted the gun back together (wouthout using any more filler, or sanding etc), and gave it a very rough paint job to see how it would have looked and felt, which is surprisingly good (although a better paint job would be required.) I'm going to keep it now as a wall hanger, but I may sell it on in future if anyone is interested - it could be made to work with the some dedication.


Thanks to everyone who helped with parts,
regards,
-Matt
Shame about the gearbox etc!

Looks great, sorry to hear it didn't work out.
Friends meet to part - love laughs at faith;
True foes, once met, are joined 'til death!
Bloody hell, bad news about the box, can`t understand why the 7.2 battery would`ve damaged a 7.2 gearbox unless the box was a bit dodgy in the first place. Looks like a cracking conversion though.
Cheers for the support guys. I don't suppose anyone fancies taking it apart, reinforcing the gearbox and seeing if they can get it working do they? I can supply some kit, or cash if required (although not loads i'm afraid).
It seems a shame to abandon it after so much work. I think though, regardless, I will finish the externals at some point and give it a propper paint job.
-Matt
Bloody hell, bad news about the box, can`t understand why the 7.2 battery would`ve damaged a 7.2 gearbox unless the box was a bit dodgy in the first place. Looks like a cracking conversion though.
It probably relies on the fact that the original battery cant provide enough current to over-drive the box.
Aye, thats what I reckon. If I don't get the gears replaced with reinforced ones, i'll step down to a 6v battery.
-Matt
Out of interest, why did you pick the Mk1-43? The Mk1-42 had no cutouts in the rear frame - you could probably fit an M14 box in then.
http://world.guns.ru/smg/smg65-e.htm
Just personal preference - I think the 1943 version looks better; in fact my favourite is the completely skeletonised version, the 1943 with the 1942 stock. I would have built that, but i'd have had nowhere to put the battery:
The other thing was materiels - I wanted to do the project on a shoestring, using materiels I had lying around the house. I could afford a bit of money for paint, or a few scrap parts, but I couldn't invest in a new gearbox.
Now that I have a half decent set of externals, i'm willing to put some cash or resources into getting it working again.
There is a very good version, made by an engineer in NZ. Details are in the WW2 and Home made guns picture sections on arnies airsoft if anyone fancies a look.
regards,
-Matt
I took the gun apart to day, to see if I could fix it, and I think I have - the problem as it turned out wasn't a stripped gear, it was that the gear on the motor wasn't meshing with it's nearest counterpart in the box. There was a small piece that pushed this gear into the motor gear, but the spring had worn out and wasn't doing its job any more. I replaced the spring with a small bit of balsa, which I superglued into place, and the gearbox is now working, and the gun is firing (fairly reliable, with the odd missfeed).
Interestingly, the gears are steel so it should prove more reliable than I thought.
It does look even more worse for wear though, as a lot of paint and epoxy was lost in the process.
regards,
-Matt
