

It never ceases to amaze me that airsofters will spend hundreds on kit and guns but wont spend £40 on a chrono. Get a laylax this or sprung guided that and then shoot the wife? I'd rather put shots into my foot and find out which made me scream the most than dare to turn a gun on She who must be obeyed. Finally sold my m700 aics (sob) picking up mp44 next week 


I'd just like to point out that wifelet costs a lot more than a £40 chrono. A hell of a lot more ![]() And she might as well do something useful for a change.
And she might as well do something useful for a change. 


I'll be stripping the stock and making it more wood coloured. One of our lads picked his up a couple of weeks ago and has put a thread on the bolt that holds the stock in place and theaded a nut to fit it all tight in place, I'm going to get him to do mine and will post pics to show what I mean. Has anybody figured something useful to go in the oil bottle bit in the stock? I was thinking of seeing if I could fit a slim lighter in mine? Do you remember those table lighters in the late seventies that looked like a gun? "honest love, it's got to live on the coffee table, it's my new lighter." Also well handy for a tactical fag when waiting to respawn! ![]()
Was there a bayonet for the mp44?

Hola ya'll!
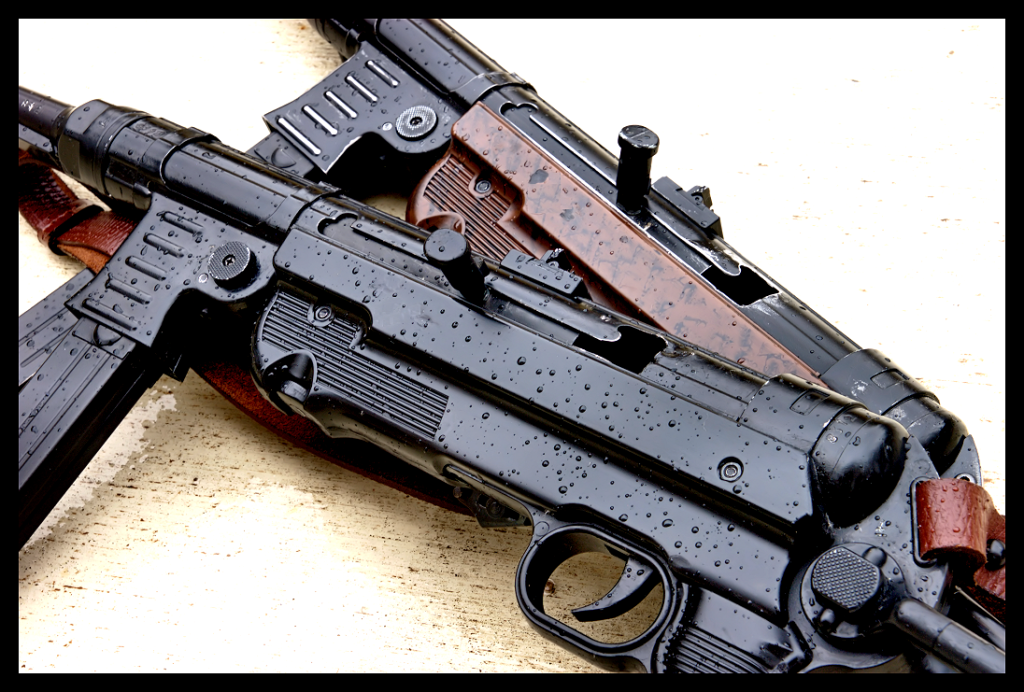
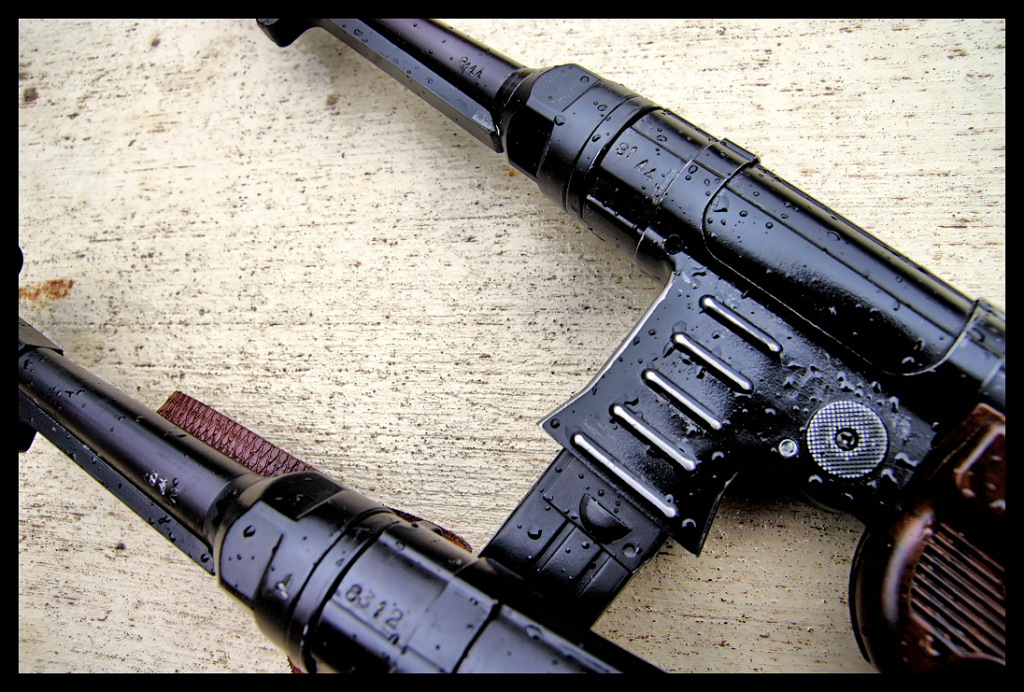
I haven't been around in a good while, but the new MP44 has gotten me psyched about weathering again, so I thought I'd share mine and one I did for a customer. (I love these things!)
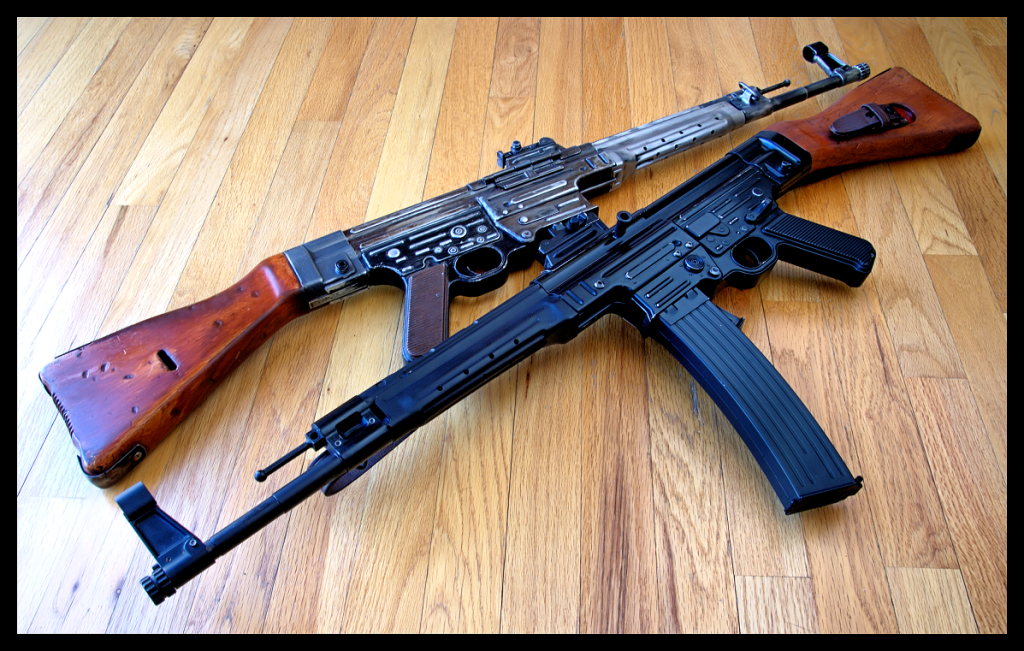
The MP44 at the top I wanted to represent a late war, cobbled together with whatever parts were still available the day it was made- Blued trigger group, and the phosphorized finish on the receiver and mag well area. For mine, I wanted to stay with the all blued, then worn look.
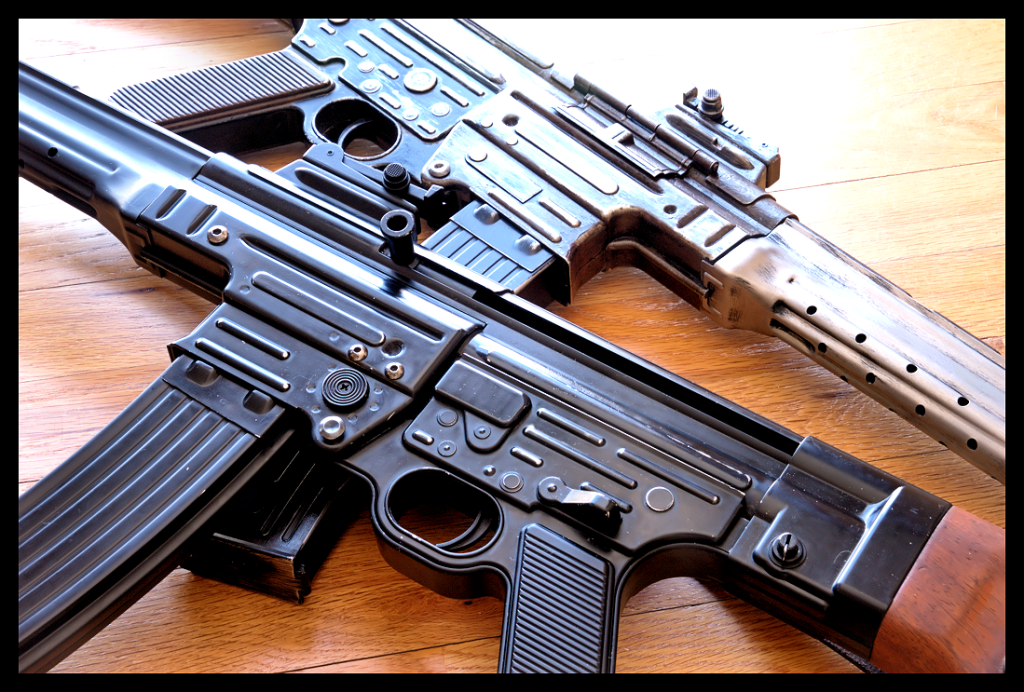
Based on the hodge-podge of metals used in these guns, I really stay away from the bluing chemicals and solutions- too much effort for the results acheived, and really, the money spent on those hazardous materials would be better spent on a dremel and some polishing pads- That's honestly all you need to get a nice, deep shine from these like blued steel. I'm still torn on the pistol grips on mine- Some did have black plastic grip panels, so it is still somewhat correct.
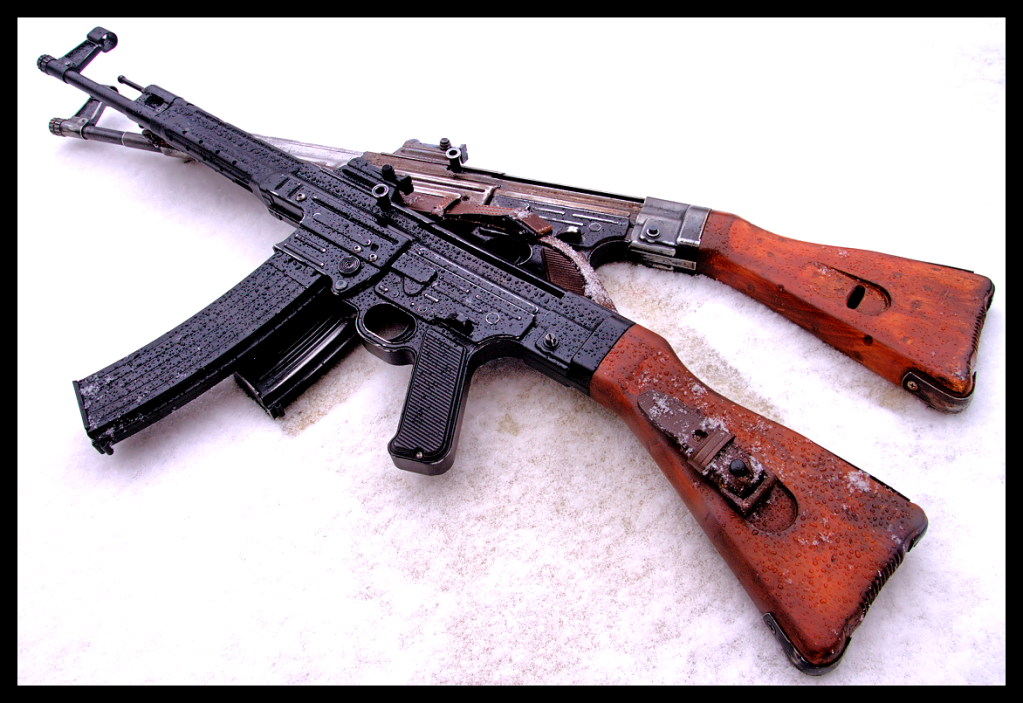
We had a nice spring snow storm this weekend here, thought I'd do a little Eastern Front action....
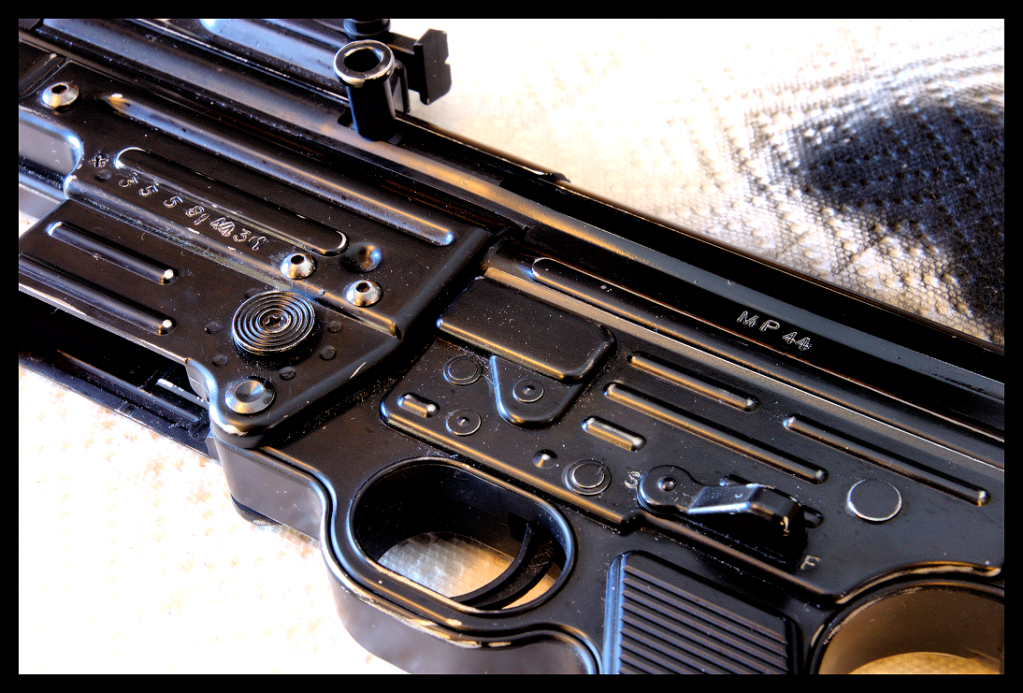
Picked up some 1/8 in. number and letter steel punches and added some crude serial numbers and factory stamps-
Lead, Follow, or get the %$@#!! outta the way!!

nice work! did you use any polishing compound? how about a quick how to?


Vorsprung durch Blitzkreig !
Speed, aggression and Hugo Boss
the innocent have nothing to fear......[img][/img]
It looks to me like he used snow... We'll have to wait for next winter to be able to do that... ![]()

Nice work. Just goes to show how nice these things can look wit ha bit of work. Really like the job you've done on the stocks. Can't wait to get mine now.

Guinness - another excellent couple of pieces of work. Thanks for sharing
nice work! did you use any polishing compound? how about a quick how to?
Yessir, I used the reddish compound that comes with the dremel kits- Apply with the small white buffing pad, then buff out with the larger pad. I repeat that process twice,then just use the larger pad and softly buff and buff till its a deep shine.
I worked on the MP40s this weekend because the weather was a bit raiiny.

added serials numbers....
Lead, Follow, or get the %$@#!! outta the way!!

Well, aside from the outstanding gun work, nice photos!!!


Very nicely done and not too OTT. I'm picking up my downgraded MP44 next weekend and I'm certainly going to have a go at some gentle weathering.
Looking for some advice, I'm also thinking of getting a K98 sling for it. It's now occured to me putting a sling on might put a lot of pressure on the stock joint to the body, and make the stock wobble worse. Anyone had any problems? .Thoughts or advice welcome.


Thank you!
The stock is pretty much the Achilles heel of the weapon- I have two and they both had the same issue. I have made both rock-solid by simply replacing the two half-inch screws with longer, maybe one size larger, wood screws- those stocks aren't going anywhere. I read of someone using pliers to crimp the metal 'sleeve' around the wood at the back, but that is really kind of silly if you think abouit it- it certainly won't last, and now you have changed the shape of the metal- don't do it that way- do it right and get better fasteners (wood screws)
Slainte!
Lead, Follow, or get the %$@#!! outta the way!!
Haha!! ![]() ..That would be me Guinness..I crimped the metal sleeve that overlaps around the reciver to reduce movement,and it worked just dandy!!.On my MP44 the slop was just between the metal parts.
..That would be me Guinness..I crimped the metal sleeve that overlaps around the reciver to reduce movement,and it worked just dandy!!.On my MP44 the slop was just between the metal parts.
My stock sits just fine with the screws that came with the gun but changing them to woodscrews is a good idea though..
Haha!!
..That would be me Guinness..I crimped the metal sleeve that overlaps around the reciver to reduce movement,and it worked just dandy!!.On my MP44 the slop was just between the metal parts.
My stock sits just fine with the screws that came with the gun but changing them to woodscrews is a good idea though..
Lol, I thought so, I didn't want to offend
Whatever works I suppose!
![]()
Lead, Follow, or get the %$@#!! outta the way!!
I stripped and stained my stock today (dark walnut) and have so far applied 3 coats of finishing oil. I replaced the stock screws with slightly bigger wood screws and replaced the phillips screws with domed slotted woodscrews which tidies all that up. Personally I'm not a fan of "weathering" the weapon too much but I was really impressed with the finish that Guiness got with a dremel and a buffing pad so I've started buffing it and tomorrow evening will go over the whole gun. Thanks very much for the tip

nice work! did you use any polishing compound? how about a quick how to?
Yessir, I used the reddish compound that comes with the dremel kits- Apply with the small white buffing pad, then buff out with the larger pad. I repeat that process twice,then just use the larger pad and softly buff and buff till its a deep shine.
That "reddish compound" is just Jewellers rouge - a very, very fine abrasive.


When we were a Kingdom it was run by a King
When we were an Empire it was run by an Empress
Now we're a country we're run by a..........
nice work! did you use any polishing compound? how about a quick how to?
Yessir, I used the reddish compound that comes with the dremel kits- Apply with the small white buffing pad, then buff out with the larger pad. I repeat that process twice,then just use the larger pad and softly buff and buff till its a deep shine.
That "reddish compound" is just Jewellers rouge - a very, very fine abrasive.
Right on, thanks! Hell, I'm an American, we don't tend to bother with trivial stuff like reading instructions, understanding what the red stuff you just slathered all over your gun is.....stuff like that ![]()
So then, now that I'm a little more educated, what would actual polishing compound be? More or less abrasive than the 'rouge' ? That stuff was the business, I'm not sure I'd want to risk something more abrasive...
Lead, Follow, or get the %$@#!! outta the way!!
Hell, I'm an American, we don't tend to bother with trivial stuff like reading instructions.
Correction, you are a Man and dont read the instructions.... it's unilateral mate
Polishing compounds come in different grades, from very fine right up to the rough stuff. Personally, I find that jewellers rouge does the job quite nicely - I used to use it for polishing Ally pistol slides with great results.
When we were a Kingdom it was run by a King
When we were an Empire it was run by an Empress
Now we're a country we're run by a..........
