
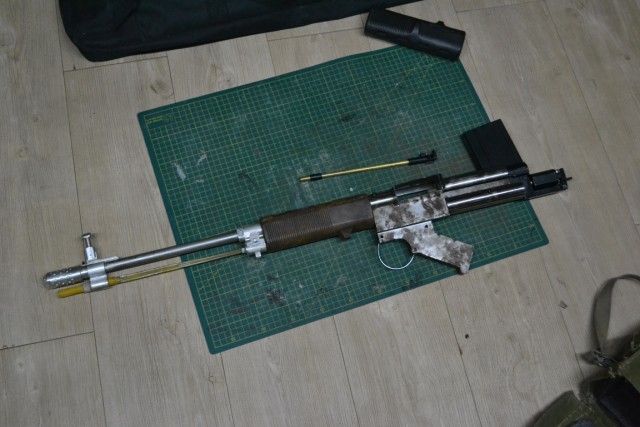
I think i've gotten far enough along on this build to warrant a post on progress...anyway, here's my take on the FG42 (or at least what i have so far).
I wouldn't have started this build if i wasn't able to buy a resin/fiberglass kit of an FG42 from indonesia.
Link: http://x5model.blogspot.com/search/labe ... ehr%20FG42
This is the first time i've used a cad program for a build. I was just a math paper and ruler sort of guy before, sometimes not even. But i got to try my hand a Google Sketchup, and man, was i hooked. Extremely easy to learn and less trial by fire come build time. So here is the design phase, with a sten gearbox and hop up as the base:
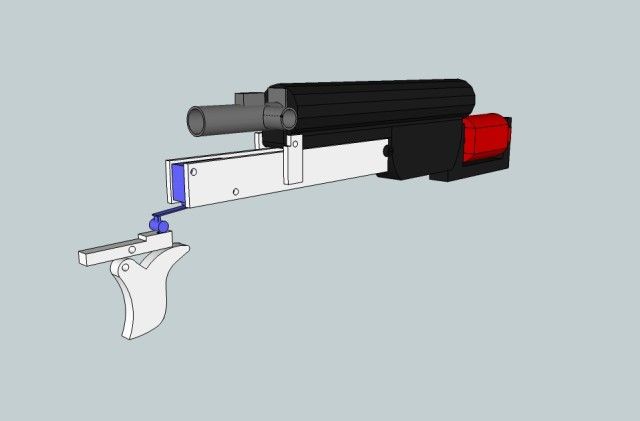
The receiver would have to be much bigger to accommodate the gearbox. One could fit a modified version 3 gearbox in the buttstock and custom build a very long nozzle and hop up to keep the dimensions closer to reality but i did not want to mess around with potential leaks and low power later on. I chose the sten gearbox because the nozzle and tappet is centrally located and the motor is straight. I will be removing the sten trigger and hooking up a microswitch. Dimensions of the receiver take into account existing pipe and box steel dimensions.
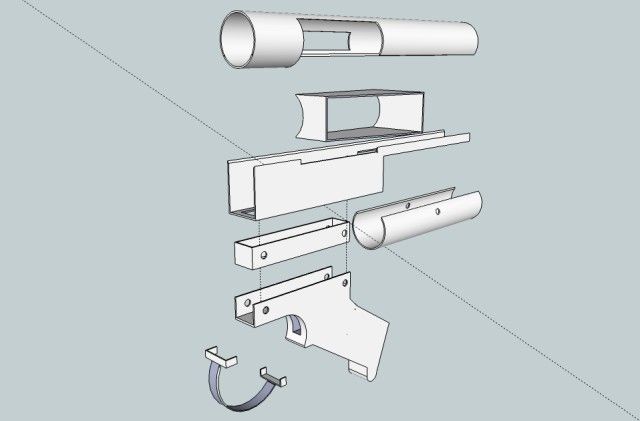
The great thing about using a cad program is that i can actually work on designing other components while waiting for the machine shop to finish other stuff. So while the barrel and other bits are being machined, i can work on the receiver, stock, and handguard...
Here's what i have so far...
At first i was hoping to use parts from the kit directly but unfortunately, it's made of very thin and brittle fiberglass. I had the handguard and bipod copied in high impact fiberglass. I still have to adjust the size of the stock to fit the larger receiver then that's going to be done in more durable fiberglass as well. I'll be using m14 mags for this. I chose m14 mags mainly because king arms has a cheap set of 5 midcaps in plastic, which will be easier to modify. They will be going into the magwell in a reversed orientation though.
compared with the kit:

Much more to come...
Looks incredible I've never seen one of these done in airsoft I don't think! 
Jay851 build one out of solid aluminum a while back. His build was a major inspiration for this one. Another excellent build was done by Schmitty over at the US forums. My main problem was that both these builds (the latter more especially) made use of a Shoei FG42 in part or as a whole. And those things are both rare and very expensive. That's why when i saw a fiberglass kit being made, i jumped on it right away and started the design phase even while waiting for the kit to arrive (4 weeks).
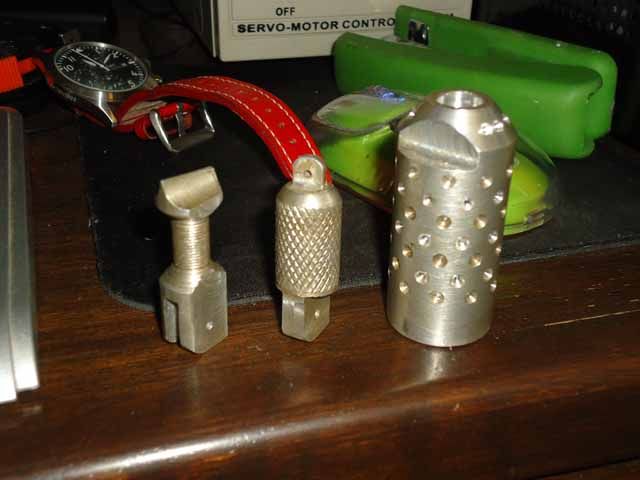
front and rear sights, muzzle

Looks cracking. You don't see many of those around! I shall watch this with interest.
Show me a man who will jump out of an airplane, and I'll show you a man who will fight!
General James M. Gavin
CRY HAVOC AND LET LOOSE THE DOGS OF WAR


Update:
I'm having a bit of trouble trying to design the butt stock though. The plan is to enlarge the current resin/fiberglass one to fit the gearbox and the back end of the receiver then recast in stronger weave fiberglass. But i'm stuck as how to secure this to the metal receiver in a durable way...any ideas?
Bloody awesome!
For securing the stock, what about fitting a steel frame off the back of the tube around the gearbox and then slide the stock over it and attach it with screws right at back through the butt plate?
You could make it like a steel skeleton stock for the strength and then it'd all be hidden by the grp stock?

once you have the two halves of the stock shell,wrap the rear of the gun in cling film , especially the gearbox, then lay down one half of the stock and inject expanding foam(the plumbing type) lay a layer of cling film over the top then lay the gun body and gearbox assembly in position, fill the other half of the stock with the foam then pace on top and secure firmly in position with tape,be sure to get it all aligned accurately and allow the foam to set.
once its all set separate the two halves, they should split along the cling film , remove the cling film from the body and gearbox, you should now have the two parts of the stock with a snug cavity inside for the gun , from there it should be a fairly simple matter to secure it.
armoury
m1a1 Thompson,sten mk2,mp40,stg44,sterling,mk2 bren gun,lee Enfield no4 mk1,Mauser Kar98, Walther ppk,smith and Weston m10 and Mauser m712
Give me a big enough hammer and a place to stand and I could fix the world.
i'll kill a man in a fair fight or if i think he's going to start a fair fight or over a woman or.......
a problem shared is a problem halved ,but an advantage shared is no advantage at all
if a job's not worth doing then its certainly not worth doing well


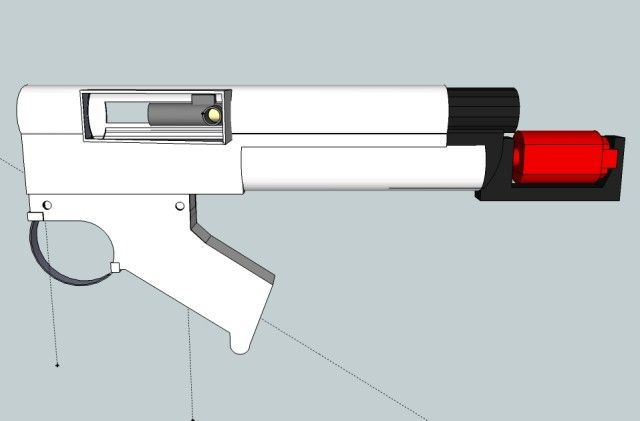
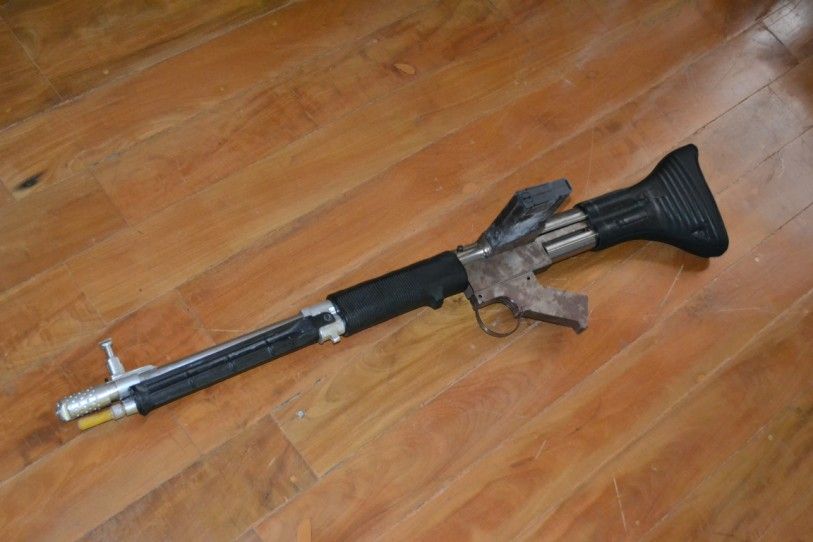
Basic externals. Now to secure them all together and fit the internals...

looks good
armoury
m1a1 Thompson,sten mk2,mp40,stg44,sterling,mk2 bren gun,lee Enfield no4 mk1,Mauser Kar98, Walther ppk,smith and Weston m10 and Mauser m712
Give me a big enough hammer and a place to stand and I could fix the world.
i'll kill a man in a fair fight or if i think he's going to start a fair fight or over a woman or.......
a problem shared is a problem halved ,but an advantage shared is no advantage at all
if a job's not worth doing then its certainly not worth doing well
grate job ! ![]()
team shoot and scoot, TL

thing of beauty mate, would love one of these but dont have the skills or equipment to do it so far play to you be great to see it done.

Coming on very well indeed! ![]()
A Proud Member Of 'Team Spleen!' who play mainly at Gunman Airsoft, Tuddenham, Suffolk.


Cracking!
Thanks for the suggestions and replies!
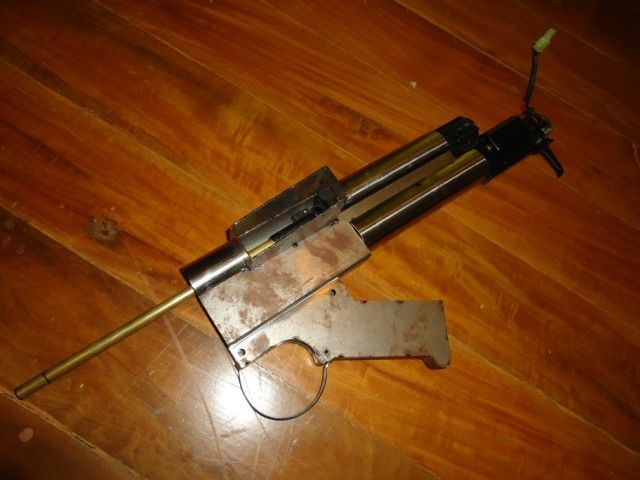
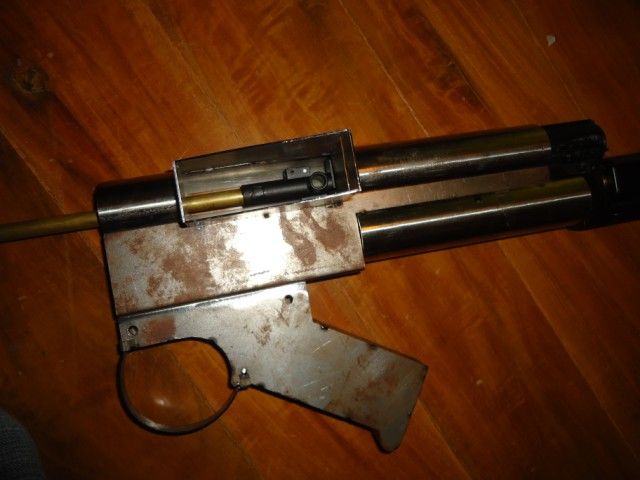
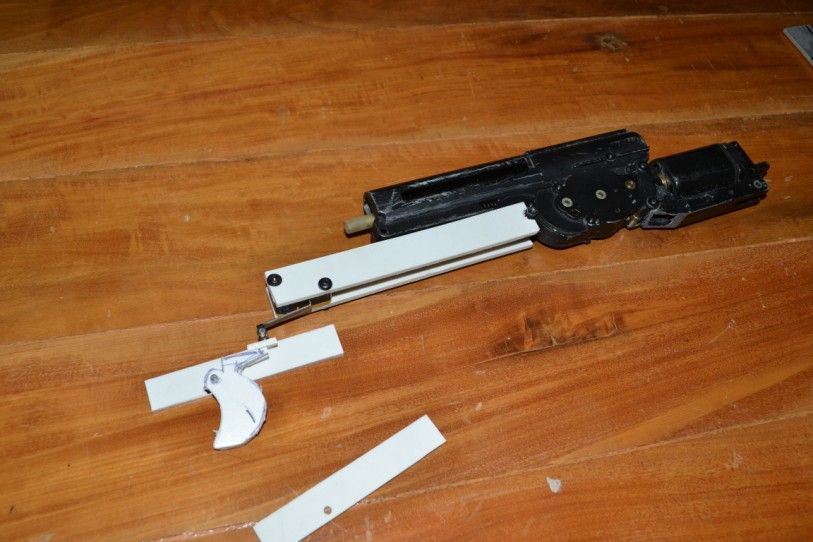
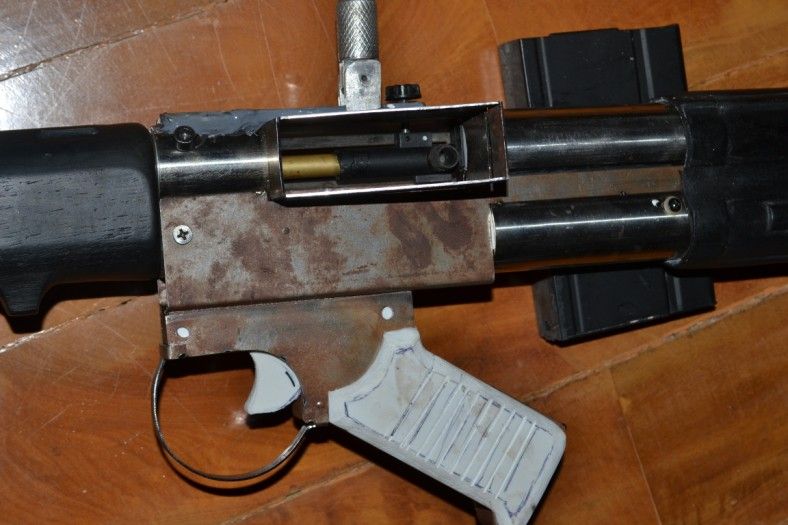
Worked on the trigger mech today. Main switch is a microswitch. Made the prototype mechanism out of Sintra board. It seems sturdy enough as it is so i may defer translating it into aluminium sheet.
Update:
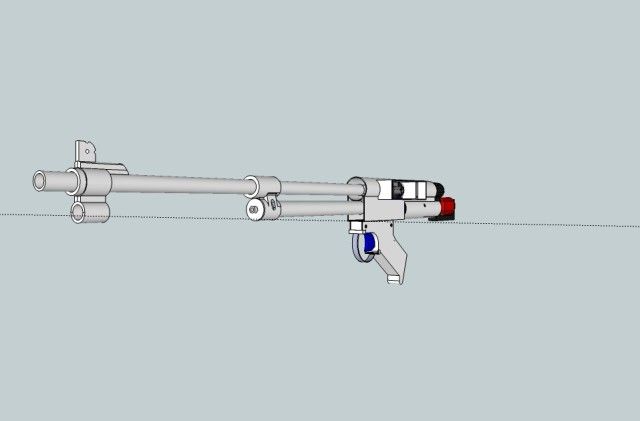
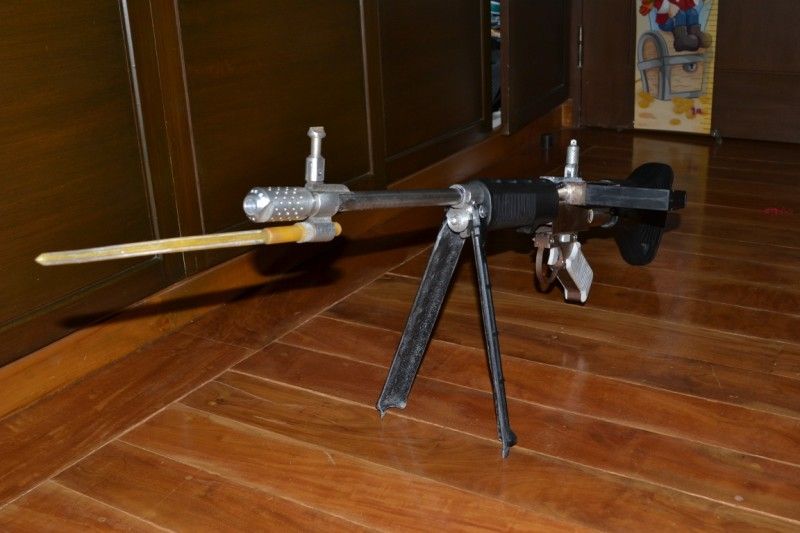
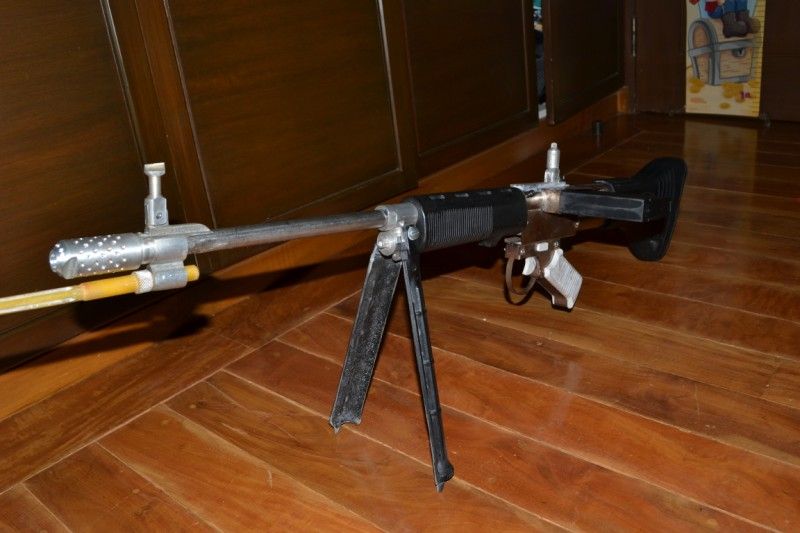
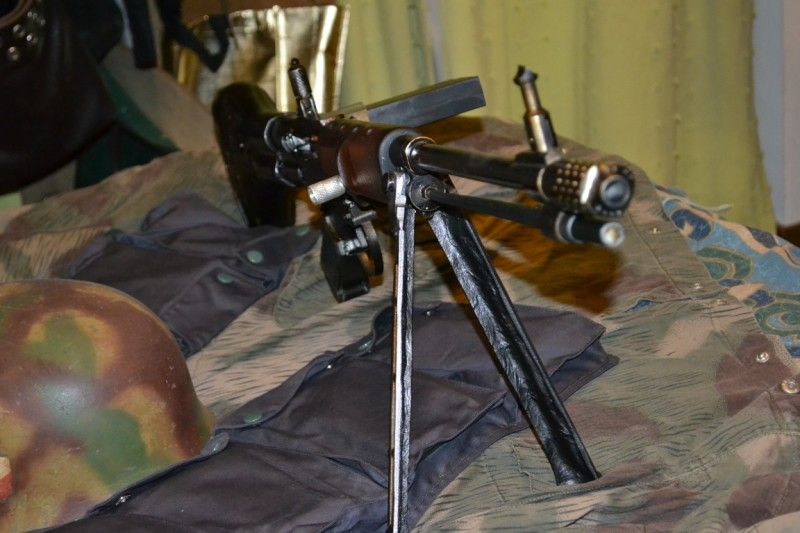
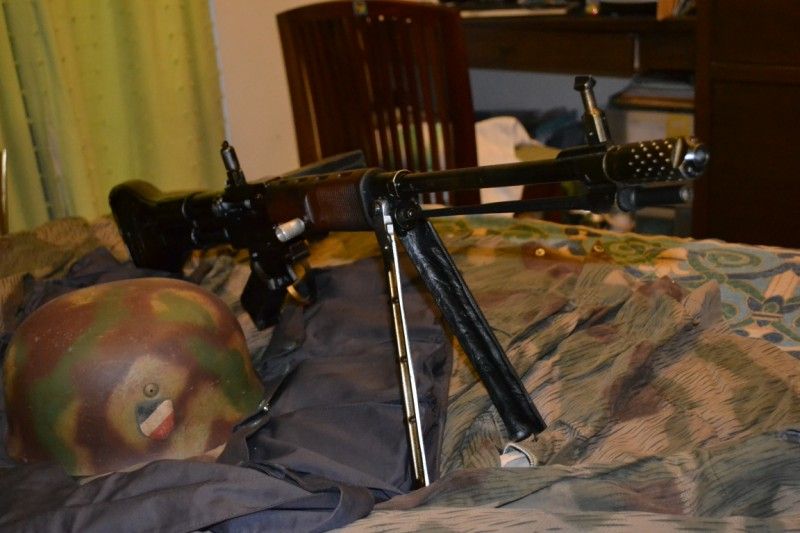
All externals fitted together nice and snug, locked in place.
Bipod does not swivel out though. They have to be unscrewed and repositioned for deployment. I won't be using them except maybe for picture taking though.
Made the grips out of sintraboard and epoxied them in place.
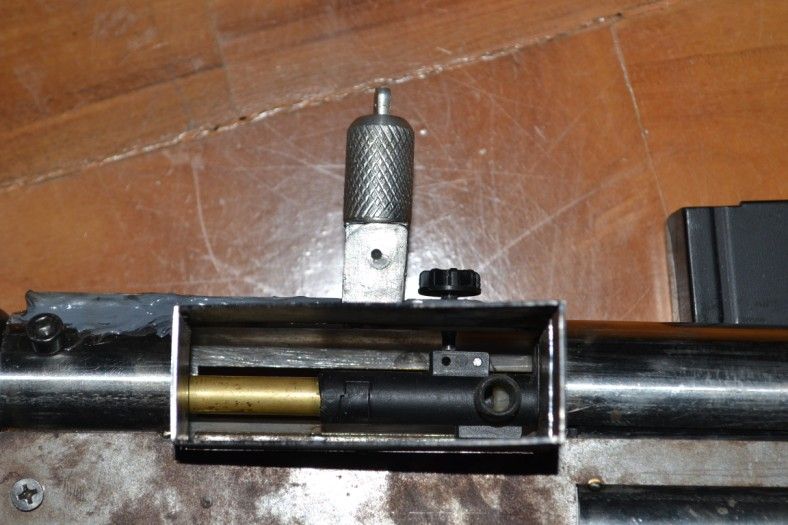
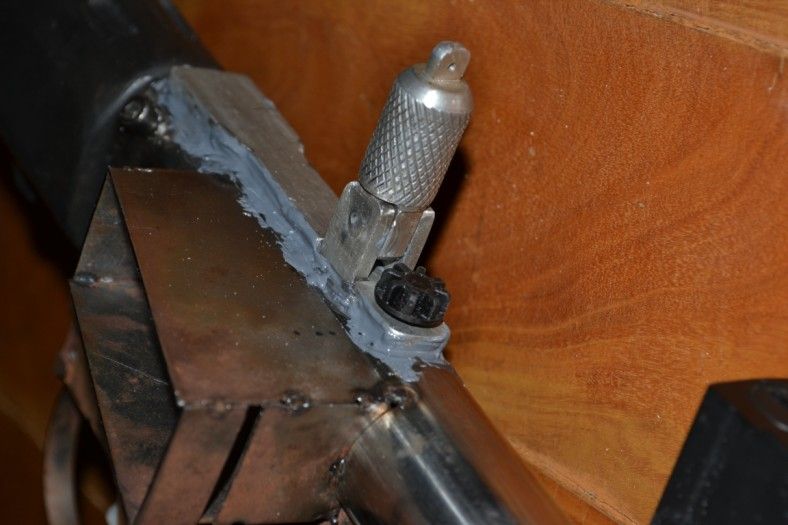
Epoxied the top of the receiver (rear sight mount) and hop adjust. Will have to sand to make flush against the receiver once it fully cures. The front and rear sites do not fold and are fixed in place (mainly due to laziness on my part). The hop adjust came from an m14.
Still to do:
Still need to obtain a 600mm inner barrel
adjust the nozzle
wire in the microswitch and mosfet without active breaking
paint
Edit:
Update:
It's all wired up and shoots! It's aliiiiive! I hope the micro switch lasts with the non-active breaking mosfet to protect it...
Still have to get a longer inner barrel, adjust the nozzle to the right length, and do some durability mods to the gearbox (metal bushings, spring guide with bearings, corner mods, maybe a sorbo pad, aoe mods.
Then paint!
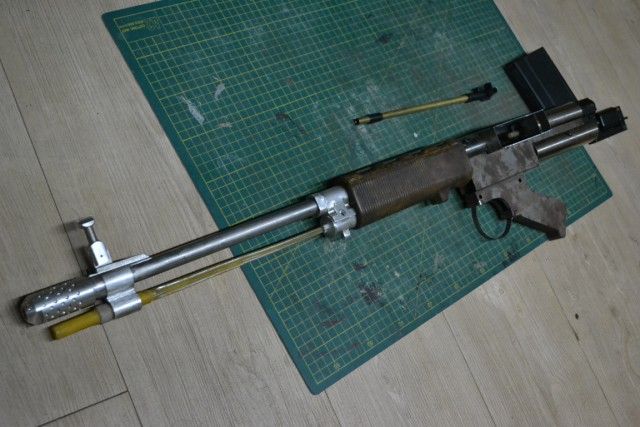
Update:
Found an old 550mm barrel and decided to use that instead of buying a new one.
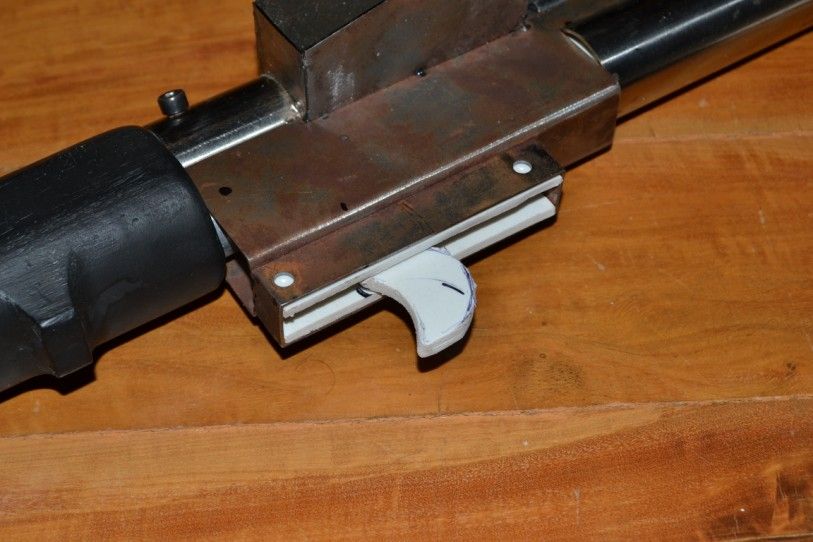
Modified the 1st release AGM sten hop unit to make it adjustable.
I had to find a longer nozzle because the securing holes for the gearbox were drilled 2mm to far back. So i added 2mm to the hop-up chamber where it rests against the gearbox, used an longer nozzle i found in my parts box (i don't remember from what aeg) and sanded it to the right length. It should be long enough to seal with the hop rubber but short enough to allow bbs to feed. I also filed the front face of the tappet in order for the nozzle to sit a bit more forward. I replaced the plastic bushings with 6mm steel ones and the plastic spring guide with a version 3 with bearings.
Shoots great! Without any misfeeds, despite the custom nozzle length. Great trigger response due to the mosfet.
All that's left to do is some of the cosmetics and paint!
So damn awesome!
Many congrats on such an inspired build!
A Proud Member Of 'Team Spleen!' who play mainly at Gunman Airsoft, Tuddenham, Suffolk.

One of the best customs I've seen my friend, you'll be envied on the battlefield I'm sure!
Looking forward to seeing it painted, very nice work indeed


Wow, Thanks!
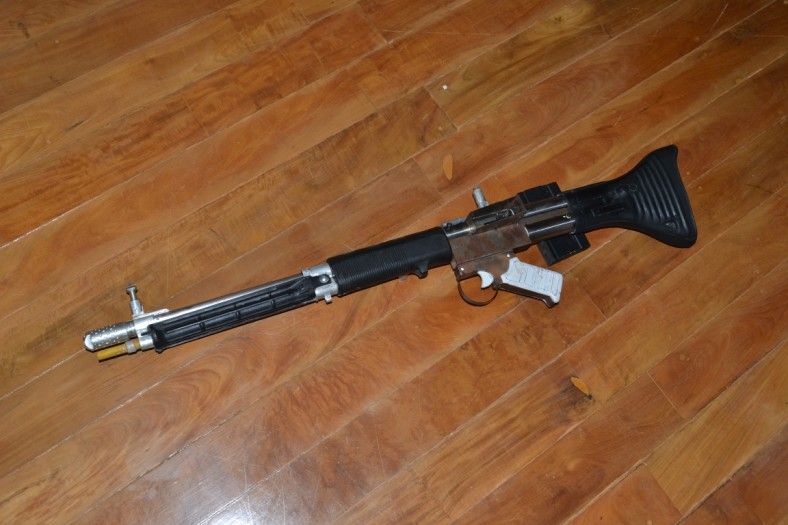
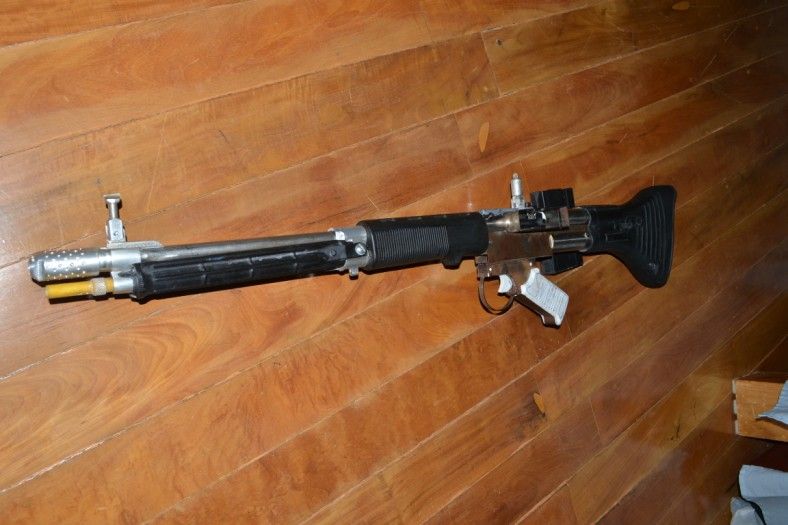
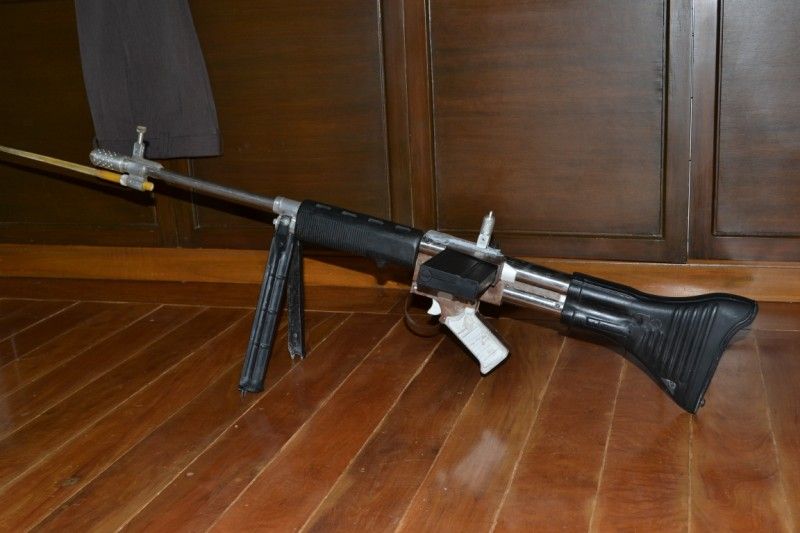
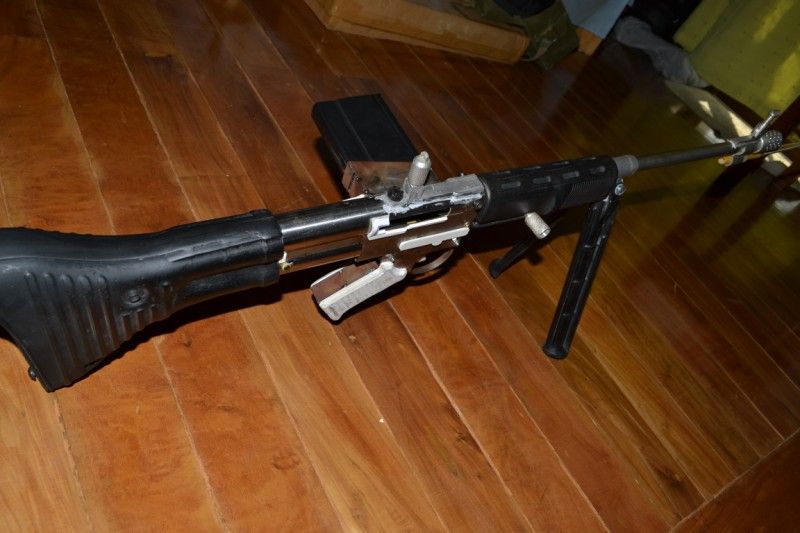
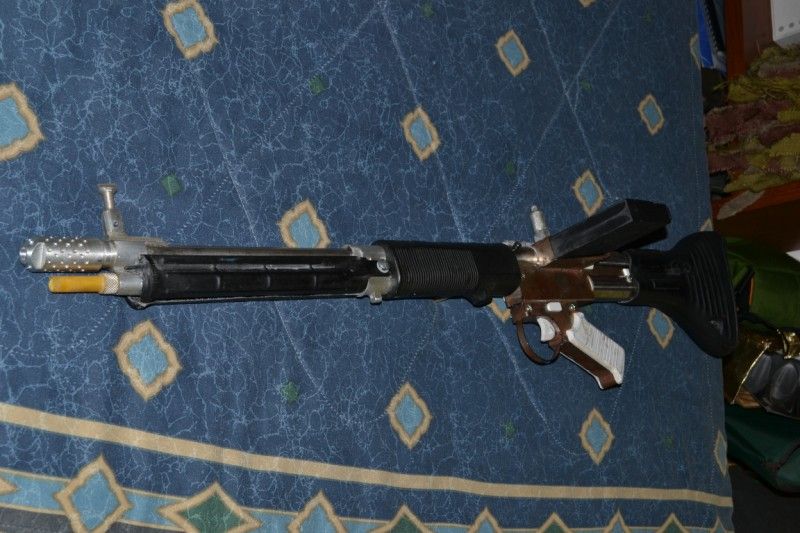
Well, here it is. My take on the FG42 type 1 ...inspired the the builds of Jay and schmitty..
To summarize:
Receiver is 1mm sheet steel folded and welded to two steel tubes with a 32mm id.
Iron sights, barrel, muzzle, bayonet lug, bipod mount/gas tube are aluminium.
Bipod, handguard, buttstock are fiberglass.
Internals: version 7 gearbox, modified nozzle, sten motorcage, sten hop chamber, microswitch, mosfet without AB.
Magazine: King arms M14 midcaps
Again, i wouldn't have been able to build this without this kit:
http://x5model.blogspot.com/search/labe ... ehr%20FG42
Here are the pics:
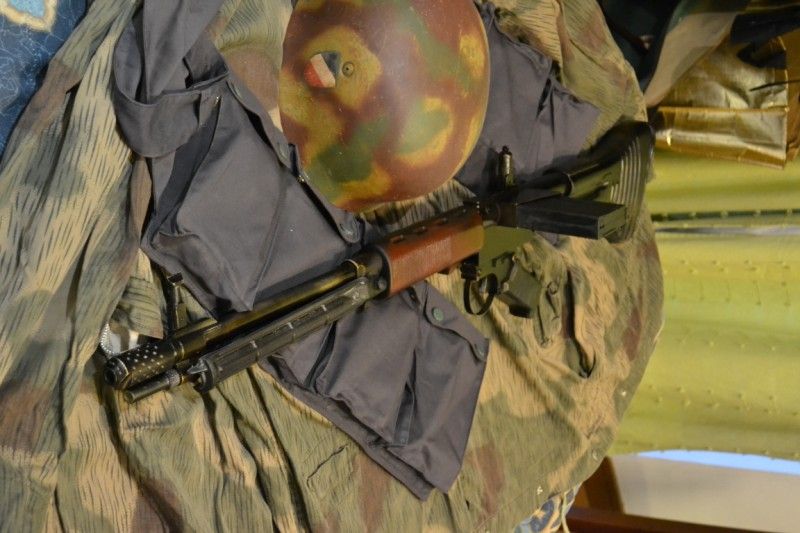
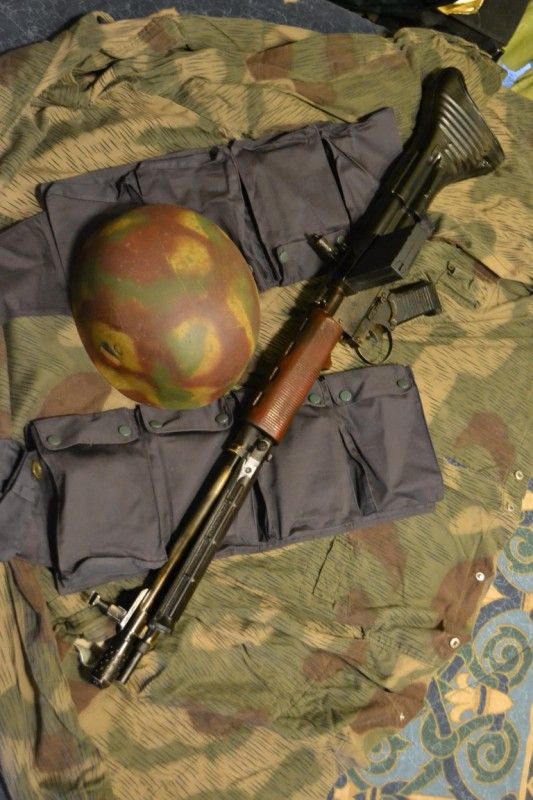
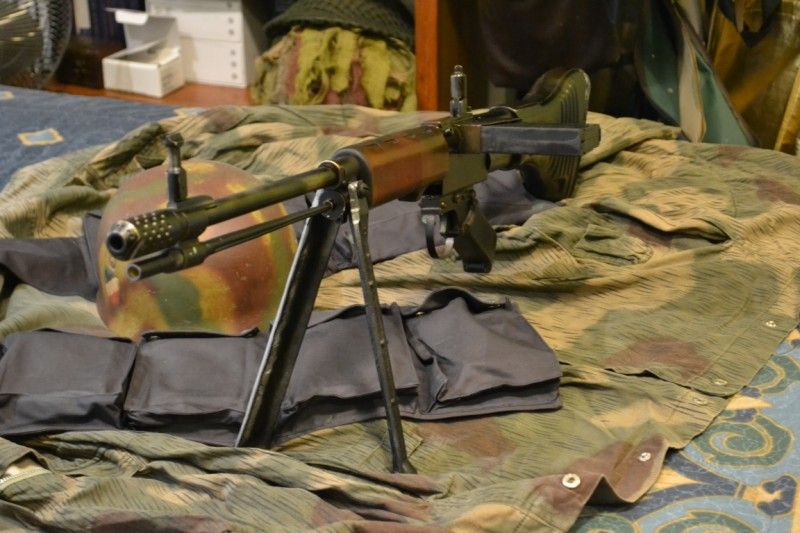
Unfortunately, because of the local gunban (election season over here), outdoor pics will have to wait...in the meantime here's a poor indoor shot just for size reference

Bloody fantastic mate!
Great work
